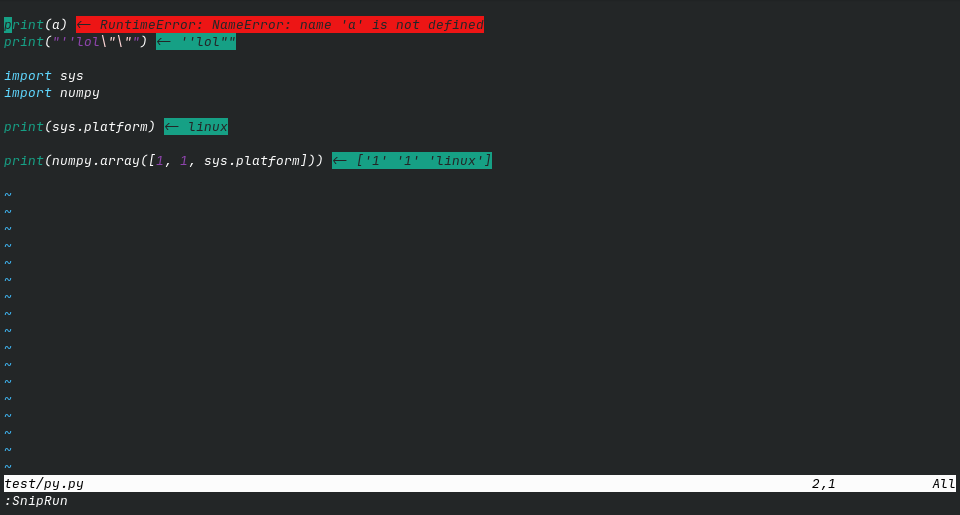
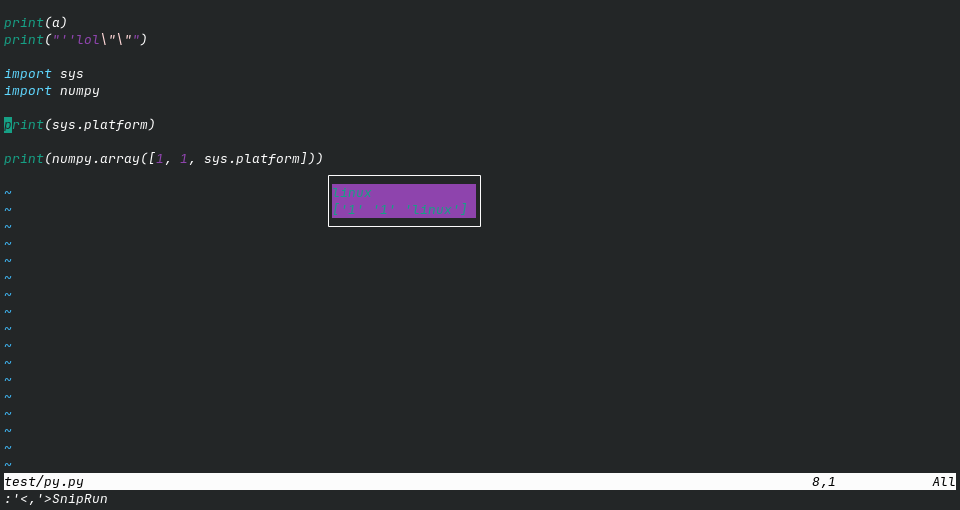
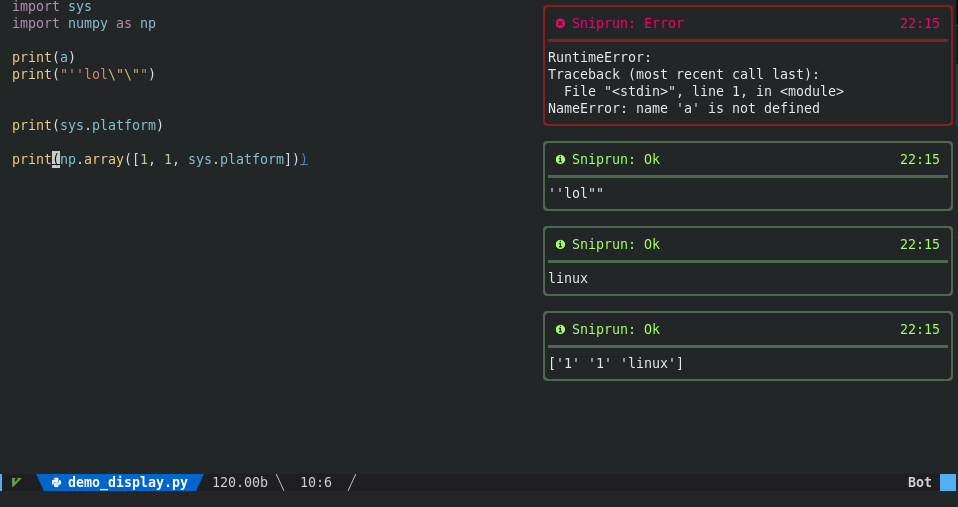
Introduction
Sniprun is a code runner plugin for neovim written in Lua and Rust. It aims to provide stupidly fast partial code testing for interpreted and compiled languages. Sniprun blurs the line between standard save/run workflow, jupyter-like notebooks, and REPL/interpreters.
I know that this README is exhaustively long, but Sniprun itself is and will remain rather simple: don’t be afraid, questions are welcome too.
Demos
Send to Sniprun snippets of any language. A few lines of code are now within a print statement’s reach :-) (this may be cool)
An example in C, look in the command area:
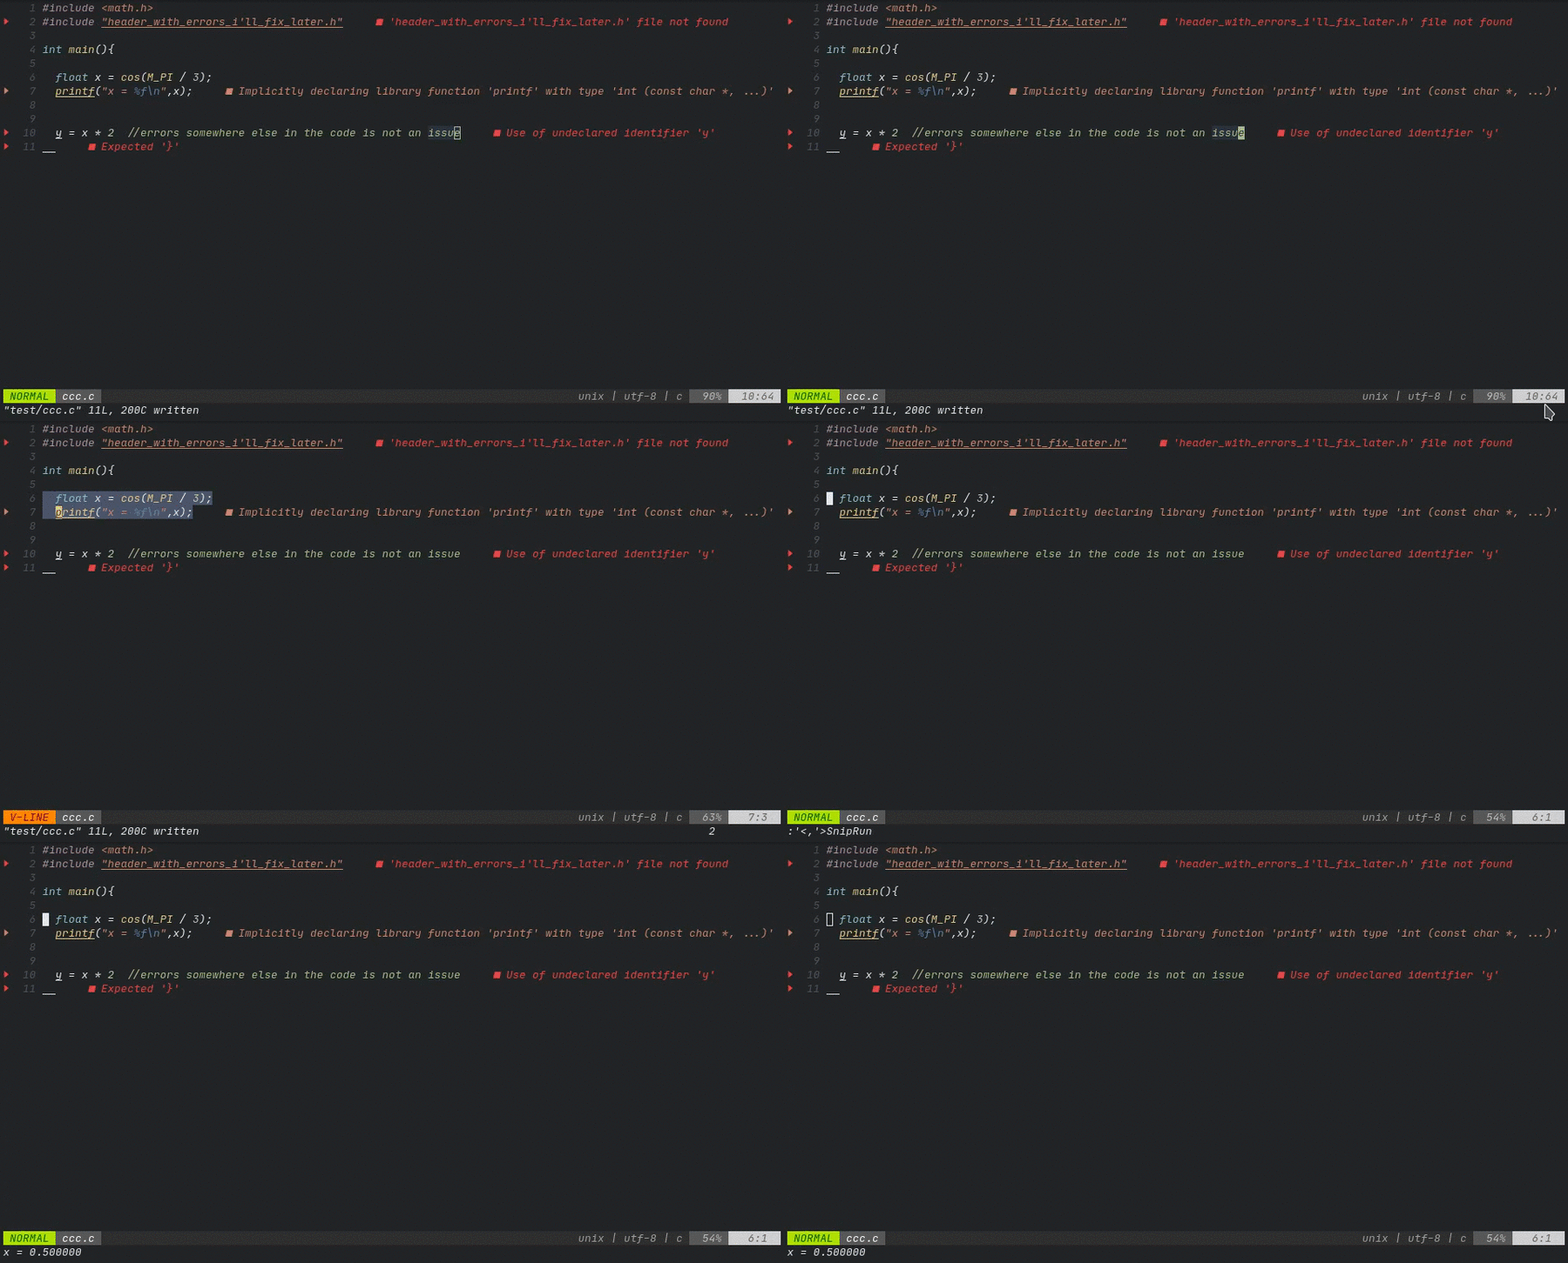
The result can be returned in multiple (even at the same time) ways:
|
|
|
|
|
|
send-to-REPL-like behavior is available for some languages
Python, R, D, Mathematica, Sage, Julia, Javascript & Typescript (via deno),
Clojure, Rust (via evcxr) and Lua, coming soon for many other interpreted and compiled languages.
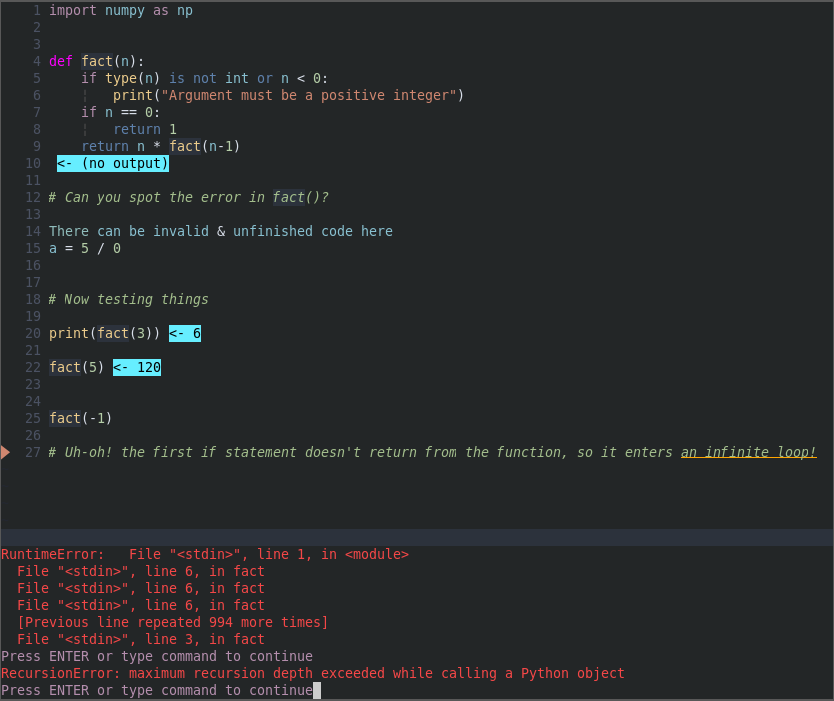
Very versatile, you can even run things like GUI plots on the fly!
What does it do ?
Basically, it allows you to run a part of your code.
Do either of:
Position the cursor on a line and
:SnipRunSelect some visual range, then
:'<,'>SnipRunCombine a motion with the operator
Activate the live mode
(through a shortcut!)
and … that’s it!
Sniprun will then:
Get the code you selected (selections are rounded line-wise)
Optionally, get additional information if necessary (auto retrieve import when supported for example)
Add boilerplate when it exists. In C, it surrounds your snip with “int main() {”, “}”. (disclaimer: oversimplifed)
Build (write to a script file, or compile) the code
Execute the code, or send it to an active REPL for evaluation
Display stdout, or stderr using the chosen method
What it is && isn’t
It is a way to quickly run small snippets of code, on the fly, and iterate very quickly and conveniently. To quickly experiment with new features (not yet embedded in classes, a whole project etc…), or to develop simple code pipelines (like a machine learning exercise) that fit in a unique file, sniprun is probably the best plugin out there.
It isn’t a way to run a whole 50k lines, 3 languages projects. A one-liner :!make run is better suited to do this most of the time.
Installation
Prerequisites && dependencies
Sniprun is compatible with Linux and MacOS. (NixOS and Mac users need the Rust toolchain version >= 1.65, in order to compile sniprun locally). Standard POSIX utilities (grep, cut, sed …) may be needed too, depending on the languages you want support for.
Neovim version >= 0.5
Compiler / interpreter for the languages you work with must be installed & on your $PATH. In case non-standard build tools or softwares are required, those are documented in the navigation pane of the wiki, as well as in the doc/sources/interpreters folder, for each interpreter, which I urge you to get a look at before getting started as it also contains the potential limitations of each interpreter; this information can be accessed through
:SnipInfo <interpreter_name>(tab autocompletion supported).[optional] cargo and the rust toolchain version >= 1.65 (you can find those here), if you want/need to compile sniprun locally. When using old version of Rust, the
--lockedflag is necessary to prevent Cargo from overzealously updating packages[optional] the plugin nvim-notify for the notification display style
Note: Since sniprun is written in Rust and many users may not have/want a Rust toolchain, a binary compiled from a Github Action gets downloaded from Releases. If you don’t want that, just install a Rust toolchain and replace the install.sh invocation in your config by cargo build --release.
Install Sniprun
Use your favorite plugin manager (recommended) …
(Run install.sh as a post-installation script, it will download or compile the sniprun binary)
packer
use { 'michaelb/sniprun', run = 'sh ./install.sh'}
(if you target the ‘dev’ branch, the installer will try to compile manually sniprun on your computer, which will require the rust toolchain)
lazy.nvim/lunarvim
Lunarvim embeds a Lazy.nvim plugin spec
lvim.plugins = { -- only for lunarvim

  {
    "michaelb/sniprun",
    branch = "master",

    build = "sh install.sh",
    -- do 'sh install.sh 1' if you want to force compile locally
    -- (instead of fetching a binary from the github release). Requires Rust >= 1.65

    config = function()
      require("sniprun").setup({
      -- your options
      })
    end,
  },

} -- only for lunar vim
vim-plug
Plug 'michaelb/sniprun', {'do': 'sh ./install.sh'}
" 'bash install.sh 1' to get the bleeding edge or if you have trouble with the precompiled binary,
"  but you'll compile sniprun at every update & will need the rust toolchain
or install sniprun manually
I trust you know how to add a plugin to the runtimepath, just don’t forget to run ./install.sh, or alternatively, cargo build --release to fetch/build the binary.
or for NixOS users
with home-manager
Sniprun is packaged for NixOS, so install ‘as usual’, aka just add sniprun to your programs.neovim.plugins .
with a standard Lua config
The normal installation way will work, as long as you compile locally the sniprun binary; example with packer
use { 'michaelb/sniprun', run = 'sh ./install.sh 1'}
you do nothing like everyone else
Have a running sniprun binary somewhere (it should be runnable on the command-line, though it will just ‘hang’)
Have the repo added to neovim’s runtimepath (for debugging:
nvim --cmd "set rtp+=/path/to/sniprun/repo")Configure sniprun to get the correct location (by default, from the repo: ./target/release/sniprun)
require('sniprun').setup({
    binary_path="/path/to/your/sniprun",
})
Usage
(you can of course see :help sniprun once installed for the complete list of commands, and :SnipInfo will have a decent share of useful information too)
You can do basically two things: run your code selection and stop it (in the rare occasions it crashes, it takes too long or sniprun crashes). You’ll probably be using only the first one, but the second can come in handy.
Running
Line mode: Place your cursor on the line you want to run, and type (in command mode):
:SnipRun
Running ‘live’ (aka running the current line as you’re typing is possible, but it’s very important to read the warnings about this, so I’m keeping the instructions in another chapter.
Bloc mode: Select the code you want to execute in visual mode and type in:
:'<,'>SnipRun
(the shorthand for :lua require'sniprun'.run('v'))
Operator mode:
Configure a mapping to <Plug>SnipRunOperator and combine it with movements to sniprun ‘text objects’. Every text-object will be rounded line-wise.
Stopping
ARGHHH I Sniprun’d an infinite loop (or anything that takes too long, or will crash, or anything)! No worries, the second and last command will kill everything Sniprun ran so far:
:SnipReset
Alternatively, exit & re-enter Neovim.
Clearing
You may want to clear virtual text, close a terminal or a floating window created by Sniprun: for this, one command to rule them all:
:SnipClose
REPL-like behavior
Some languages, see support table, also have some kind of REPL behavior: you can expect your successive commands to behave like in a REPL interpreter, and to have ‘memory’ of lines you have previously sent to sniprun.
This is easier/cleaner to implement on interpreted languages, but compiled languages can have a REPL-like behavior too using dirty tricks, or through an intrepreter such as evcxr, but no compiled language has REPL behavior for now.
Many interpreted languages will have this behavior enabled or disabled by default, you can change this with the
repl_enable = { 'Interpreter_name', 'Another_one' } and repl_disable = {'Disabled_interpreter'} keys in the configuration. Relevant info is available in :SnipInfo / :SnipInfo <name>
If something does not work, or if the ‘memory’ is corrupted by bad code you can clear the REPL memory with :SnipReplMemoryClean that is a faster and less error-prone alternative to :SnipReset for this use case.
Configuration
Sniprun is a Lua plugin, but you don’t need the usual boilerplate: if you don’t need any special configuration, you don’t need to do anything at all.
However, if you want to change some options, you can add this snippet (the default config) to your configuration file and modify if at will (you can remove keys without issue to shorten your config, as the default values are overwritten on a key-by-key basis):
lua << EOF
require'sniprun'.setup({
  selected_interpreters = {},     --# use those instead of the default for the current filetype
  repl_enable = {},               --# enable REPL-like behavior for the given interpreters
  repl_disable = {},              --# disable REPL-like behavior for the given interpreters

  interpreter_options = {         --# interpreter-specific options, see doc / :SnipInfo <name>

    --# use the interpreter name as key
    GFM_original = {
      use_on_filetypes = {"markdown.pandoc"}    --# the 'use_on_filetypes' configuration key is
                                                --# available for every interpreter
    },
    Python3_original = {
        error_truncate = "auto"         --# Truncate runtime errors 'long', 'short' or 'auto'
                                        --# the hint is available for every interpreter
                                        --# but may not be always respected
    }
  },

  --# you can combo different display modes as desired and with the 'Ok' or 'Err' suffix
  --# to filter only sucessful runs (or errored-out runs respectively)
  display = {
    "Classic",                    --# display results in the command-line  area
    "VirtualTextOk",              --# display ok results as virtual text (multiline is shortened)

    -- "VirtualText",             --# display results as virtual text
    -- "VirtualLine",             --# display results as virtual lines
    -- "TempFloatingWindow",      --# display results in a floating window
    -- "LongTempFloatingWindow",  --# same as above, but only long results. To use with VirtualText[Ok/Err]
    -- "Terminal",                --# display results in a vertical split
    -- "TerminalWithCode",        --# display results and code history in a vertical split
    -- "NvimNotify",              --# display with the nvim-notify plugin
    -- "Api"                      --# return output to a programming interface
  },

  live_display = { "VirtualTextOk" }, --# display mode used in live_mode

  display_options = {
    terminal_scrollback = vim.o.scrollback, --# change terminal display scrollback lines
    terminal_line_number = false,   --# whether show line number in terminal window
    terminal_signcolumn = false,    --# whether show signcolumn in terminal window
    terminal_position = "vertical", --# or "horizontal", to open as horizontal split instead of vertical split
    terminal_width = 45,          --# change the terminal display option width (if vertical)
    terminal_height = 20,         --# change the terminal display option height (if horizontal)
    notification_timeout = 5      --# timeout for nvim_notify output
  },

  --# You can use the same keys to customize whether a sniprun producing
  --# no output should display nothing or '(no output)'
  show_no_output = {
    "Classic",
    "TempFloatingWindow",  --# implies LongTempFloatingWindow, which has no effect on its own
  },

  cwd = '.',  --# set the working directory for build/run processes. By default or if set to '.',
              --# is neovim's current working directory. Can be overwritten by interpreter-options

  --# customize highlight groups (setting this overrides colorscheme)
  --# any parameters of nvim_set_hl() can be passed as-is
  snipruncolors = {
    SniprunVirtualTextOk   =  {bg="#66eeff", fg="#000000", ctermbg="Cyan", ctermfg="Black"},
    SniprunFloatingWinOk   =  {fg="#66eeff", ctermfg="Cyan"},
    SniprunVirtualTextErr  =  {bg="#881515", fg="#000000", ctermbg="DarkRed", ctermfg="Black"},
    SniprunFloatingWinErr  =  {fg="#881515", ctermfg="DarkRed", bold=true},
  },

  live_mode_toggle='off',      --# live mode toggle, see Usage - Running for more info

  --# miscellaneous compatibility/adjustement settings
  ansi_escape = true,         --# Remove ANSI escapes (usually color) from outputs
  inline_messages = false,    --# boolean toggle for a one-line way to display output
                              --# to workaround sniprun not being able to display anything

  borders = 'single',         --# display borders around floating windows
                              --# possible values are 'none', 'single', 'double', or 'shadow'
})
EOF
Example, to use the interpreter ‘Python3_jupyter’ whenever possible [instead of the ‘Python3_original’ default],
lua require'sniprun'.setup({selected_interpreters = {'Python3_jupyter'}})
NOTE: Some interpreters have specific options and dependencies, such as what version / compiler to use: you cand find more about that with :SnipInfo <interpreter_name>. The use_on_filetypes key is available for every interpreter (as an interpreter_option) and allow sniprun to understand that your particular/custom filetypes are compatible with an interpreter.
All of sniprun functionalities:
Shorthand |
Lua backend |
<Plug> mapping |
|---|---|---|
:SnipRun |
lua require’sniprun’.run() |
<Plug>SnipRun |
(normal node) |
lua require’sniprun’.run(‘n’) |
<Plug>SnipRunOperator |
:’<,’>SnipRun (visual mode) |
lua require’sniprun’.run(‘v’) |
<Plug>SnipRun |
:SnipInfo |
lua require’sniprun’.info() |
<Plug>SnipInfo |
:SnipReset |
lua require’sniprun’.reset() |
<Plug>SnipReset |
:SnipReplMemoryClean |
lua require’sniprun’.clear_repl() |
<Plug>SnipReplMemoryClean |
:SnipClose |
lua require’sniprun.display’.close_all() |
<Plug>SnipClose |
:SnipLive |
lua require’sniprun.live_mode’.toggle() |
<Plug>SnipLive |
✖ |
lua require’sniprun.api’.run_range(..) |
✖ |
✖ |
lua require’sniprun.api’.run_string(..) |
✖ |
Mappings & recommandations
Map the run command to a simple command such as
<leader>rCheck
SnipInfo&:SnipInfo <interpreter_name>to learn any quirk or tips about the language you’re interested in (completion is available)The operator mapping allows you to combine movements with sniprun: with the suggested mapping, “<leader>f + j” will run sniprun on the current line + the line below.
(if you don’t know what is the leader key you can find a short explanation here).
recommended mappings in lua
vim.api.nvim_set_keymap('v', '<leader>r', '<Plug>SnipRun', {silent = true})
vim.api.nvim_set_keymap('n', '<leader>r', '<Plug>SnipRun', {silent = true})
vim.api.nvim_set_keymap('n', '<leader>f', '<Plug>SnipRunOperator', {silent = true})
recommended mappings in vimscript
nmap <leader>ff <Plug>SnipRun
nmap <leader>f <Plug>SnipRunOperator
vmap f <Plug>SnipRun
For interpreted languages with simple output,
:%SnipRun(or a shortcut, wrapping it withlet b:caret=winsaveview()andcall winrestview(b:caret)in order to keep the cursor at the current position) may be a more convenient way to run your entire file. Example mapping:%SnipRunto F5:vim.keymap.set('n', '<F5>', ":let b:caret=winsaveview() <CR> | :%SnipRun <CR>| :call winrestview(b:caret) <CR>", {}), with my apologies for poor vimscript-fu.
When running the whole file, SnipRun supports taking arguments on the command line: :%SnipRun 5 "yay" frictionlessly for interpreted languages, and compiled languages with entry point detection implemented (most of them).
While both shorthands and <Plug> are here to stay, it’s better practice to use the <Plug> style ones in your mappings or if using from another plugin.
Sniprun synergises exceptionnally well with plugins that help you creating print/debug statements, such as vim-printer.
Support levels and languages
As of writing, languages can be supported up to different extents:
Unsupported/Untested : Community configs for the generic interpreter may support any language up to bloc level
Line : Code contained in a single line works, for example:
print([x**2 for x in range(10)]). Won’t work if you use a variable defined elsewhere.Bloc : You can select any piece of code that is semantically correct (minus the eventual entry point) on its own (independently of indentation) in visual mode, and run it. A sniprun-able example, in Rust:
let alphabet = String::from\_utf8(
    (b'a'..=b'z').chain(b'A'..=b'Z').collect()).unwrap();

println!("-> {}", alphabet);
Import : Support external imports, so you can test blocs of code that also depends on that external library import.
- File : Sniprun will recursively find the missing variable and function definitions to run your line of code(you don't have to select a bloc anymore). (no interpreter supports this yet)
- Project : Sniprun will detect the root of your project, and get the necessary code from files in your project, including relative imports. Basically everything you sniprun will 'work'. (no interpreter supports this yet)
Language |
Support level |
REPL Capabilities |
|---|---|---|
Ada |
Line |
No |
Bash/Shell |
Bloc |
Yes* |
C |
Import |
No |
C++ |
Import |
No |
C# |
Bloc |
No |
Clojure |
Bloc |
Yes ** |
CoffeeScript |
Bloc |
No |
D |
Bloc |
No |
Elixir |
Bloc |
Yes ** |
F# |
Bloc |
No, but could ** |
Go |
Import |
No |
Haskell |
Line |
No |
Http |
Bloc |
No |
Java |
Bloc |
No |
JavaScript |
Bloc |
Yes** (Deno) |
Julia |
Bloc |
Yes** |
Lua |
Bloc |
No |
Lua-nvim |
Bloc |
Yes** |
Markdown |
Bloc |
Yes*** |
Mathematica |
Bloc |
Yes** |
Neorg |
Bloc |
Yes*** |
OCaml |
Bloc |
Yes** |
OrgMode |
Bloc |
Yes*** |
Perl/Perl6 |
Line |
No |
Plantuml |
Bloc |
No |
Python3 |
Import |
Yes** |
PHP |
Bloc |
Yes** |
R |
Bloc |
Yes** |
Ruby |
Bloc |
No |
Rust |
Bloc |
Yes |
SageMath |
Import |
Yes** |
Scala |
Bloc |
No |
SQL |
Bloc |
No |
TypeScript |
Bloc |
Yes** (Deno) |
Your language is not officially supported ? The Generic interpreter can probably work with it !
Want (official) support for your language? Submit an issue, or even better, contribute (see CONTRIBUTING.md), it’s easy!
* (fake) REPL-like functionality, with potential unwanted side effects
** True REPL under the hood
*** REPL-like functionality if language in code block supports it
Live mode
The live mode hooks the SnipRun command to the TextChanged event, meaning that at every change to make to the buffer, the current line will be sent to sniprun for evaluation. This can mean a lot of times, especially if you type fast.
The result is a virtual text, displaying at the end of the current line that print the result (stdout) of the line. Nothing is displayed when the line is incomplete / incorrect, a bit like codi.vim.
Warnings
The live mode will execute code you didn’t think really about (and by that I mean even less than usual).
Thus:
Your code will get executed lots of times; check that your CPU can keep up. Even a ‘slow’ 30wpm typing can trigger constant program recompiles.
Sniprun will try to execute even incomplete lines, example: you hadn’t finished typing that
rm /path/to/arghhh? Sniprun saw you submittingrm /pathand removed the parent directory. For these reasons, I strongly suggest to:never run bash/shell with live mode
disable the live mode whenever your code modifies files or invoke system commands.
If you’re running a REPL-capable interpreter, while it’ll probably work, mind that:
the REPL will have to gulp a lot of incomplete code without crashing and stuff
typing b = b + 1 + 1 will increment b by more than 2 !! (since an intermediate b=b+1 is valid and thus changes b before b=b+1+1)
Configuration
You can set different display modes for live mode, with the config key
```
live_display = { "VirtualText", "TerminalOk"} --..or anything you want
```
Enable and usage
live_mode_toggle='enable' in the config, (set to either ‘enable’ or ‘off’ - the default -, the ‘uncoherency’ is only to force people to come here and read the warnings in case some smart kid want to skip and just set it to ‘on’)
and then use the :SnipLive command and start coding.
API
You can use an API to communicate programmatically from sniprun, even though some goodies (combining motions with operators) may get lost in the process, and some others effects (fetching context and imports from the current buffer) may be undesirable.
local sa = require('sniprun.api')

sa.run_range(r_start, r_end, <filetype>, <config>)
sa.run_string(codestring, <filetype>, <config>)
run_range is a function that run the specified range of code from the current buffer and takes the following arguments:
r_start,r_end(integers): (inclusive) line numbers of the range to runfiletype(string, optional): run the range as this language (:set ft?gives the filetype of the current buffer, which is used as the default)config(dict, optional): override the default user config with this. (It may be interesting to provide only the display type ‘Api’ to retrieve the results without interference on the user’s UI)
run_string runs directly the provided string as code (but has still context from the current buffer etc…):
codestring(string): the code to runfiletype(string, optional): run the codestring as ‘this language’config(dict, optional): overrides the default user config
Known limitations
Due to its nature, Sniprun may have trouble with programs that :
Mess with standard output / stderr
Need to read from stdin
Print incorrect UTF8 characters, or just too many lines
Access files; sniprun does not run in a virtual environment, it accesses files just like your own code do, but since it does not run the whole program, something might go wrong. Relative paths may cause issues, as the current working directory for sniprun will be somewhere in ~/.cache/sniprun, and relative imports may miss.
Troubleshooting
Begin by updating the plugin and running :SnipReset and then :checkhealth sniprun
Silent fail: the sniprun binary may be incompatible with your distro/OS/arch. Use
sh ./install.sh 1as post-install to compile locally.Any other kind of bug: a log file is produced in $XDG_CACHE_DIR/sniprun (~/.cache/sniprun on Linux or ~/Library/Caches/sniprun on MacOS), usually with all kinds of information of what happened during your last command.
Contribute
It’s super easy: see the exhaustive (but simple I hope)(see CONTRIBUTING.md for starters). I actually thought out the project structure so you only have to worry about one file (yours), when creating an interpreter. All you have to do is copy the example.rs interpreter and modify some parts to suit the language you wish to support.

